Thursday, July 14, 2011

Green Beans with Almonds and Thyme

I know there have been a lot of posts today but this one looked so tasty that I felt like I should share.  

Green Beans with Almonds and Thyme

Green Beans with Almonds and Thyme
Green beans are the labradors of the vegetable world, they just seem to get along with everyone. Which is why you will usually find some incarnation of green beans on a holiday dinner menu. This simple preparation of green beans, with butter, thyme, and toasted almonds, comes from my friend Heidi in Carlisle Mass, and over the years has become one of my favorites.
Print Options

Green Beans with Almonds and Thyme Recipe

Ingredients
  • 2 lbs of (fresh or frozen) green beans, trimmed
  • 1/4 cup (1/2 stick) butter
  • 1 Tbsp Dijon mustard
  • 1 teaspoon garlic salt
  • 2 Tbsp chopped fresh thyme
  • 1/3 cup slivered almonds, lightly toasted

Method

1 Cook the green beans in a large pot of boiling salted water until just crisp-tender, about 5 minutes. Drain the beans and transfer them to a large bowl of ice water, cooling them completely. (The ice water will shock the beans into a vibrant green color.) Drain the beans well. At this point you can make the beans a day ahead and store in refrigerator.
Alternatively you can steam the beans for 5 minutes and proceed directly to the skillet.
2 Melt the butter in a large, heavy skillet over medium high heat. Whisk in half of the fresh thyme (1 Tbsp), the Dijon mustard and garlic salt into the butter. Add the beans to the skillet and toss until heated through, about 4 minutes. Transfer to a serving bowl. Sprinkle with toasted almonds and the remaining 1 Tbsp of thyme.
Serves 8.

Green Thumb #4 Cucumbers

This week's tip is on cucumbers.  We have several plants that are beginning to produce flowers and will therefore start really producing cucumbers probably around mid August.  So check out our tip and enjoy watching your own cucumbers grow.


The same cucumber vine has both male and female flowers. The male flowers, also called the staminate flowers, develop first. These will quickly grow and drop without bearing fruit. The next flowers that grow will be a combination of both male and female (pistillate) flowers. This is when pollination takes place. Take into account that some cucumbers available today require special pollination and planting. Read the package instructions carefully to make sure that your cucumber flowers will pollinate correctly.
Remember that you’ll need to stimulate the presence of bees in your garden to properly pollinate your vines. Using chemical pesticides can kill off the bees and prevent proper pollination. Consider a natural form of pest control instead.
Cucumbers are generally ready to harvest after about 60 days after planting. When to harvest also depends on the variety of cucumber that your grow. Read your seed package instructions carefully for specific harvesting times.
The larger cucumbers grow, the more likely they are to loose their flavor or even become bitter. If your cucumbers begin to turn yellow, they are probably past due to harvest.
When you harvest, carefully inspect your plants (without stepping on the vines) and cut the stem about 3/8 of an inch above the cucumber itself. Once the cucumbers start appearing, harvest frequently to maximize the quality of the fruits.

http://www.cucumbergrowingtips.com/cucumber-pollination-and-harvesting-tips/

What We Have

Today's post will be a little bit different.  I am going to share all the products we will have at the Farmer's Market at Rexburg and Idaho Falls as well as produce we are going to have over the coming weeks.  From here on out I will let you know when we run out of certain items so if that particular item is one of your favorites and the only reason you come to the market you will be able to check here first.   Throughout the rest of the season we will be highligting a different product each week that we carry.  This will include health benefits, nutritional value and ingredients if possible.  So keep your eyes open for those.

Also on a happy note we have placed a new order for our dried fruits and nuts so we should be able to have enough product for the rest of the season.  This is a good note especially for those who love our Yogurt Pretzels that disappeared after 2 weeks into the market.  :)

Ok so here is the list of what we have.

NUTS
Shelled Almonds
Slivered Almonds
Roasted Almonds
Smokehouse Almonds
Raw Macadamia nuts
Roasted/ Salted Macadamia nuts
Roasted/ Unsalted Cashews
Roasted/ Salted Cashews
Mixed Nuts
Roasted/ Salted Peanuts
Honey Roasted Peanuts
Pecans
Pistachios
Soy nuts
Walnut halves
Sunflower seeds

CHOCOLATE ITEMS
Milk Chocolate Almonds
Milk Chocolate Peanuts
Milk Chocolate Malt Balls
Milk Chocolate Raisins

NON - DAIRY CHOCOLATE
Dark Chocolate Peanuts
Chocolate Sprinkle Covered Pretzels

YOGURT COVERED ITEMS
Yogurt Almonds
Yogurt Peanuts
Yogurt Raisins
Yogurt Pretzels

DRIED FRUIT
Chinese Apple Rings
Fancy Apple Rings
Apricots
Banana Chips (sweetened)
Plums
Cranberries
Peaches
Pears
Crystalized Pineapple
Crystal Ginger
Black Raisins
Golden Raisins

SESAME STICKS
Honey Roasted
Cheddar
Regular

MIXES
Aloha
Cajun Hot
Creme Brulee
Cranberry Pecan
Goji Power
Hiker's Trail Mix

OTHERS
Razz-Cherries
Peanut Brittle Crunch

As far as produce goes we will have the following:

Grown by us:
Tomatoes - Beefsteak, Early Girl, Grape, and Roma,  Hydroponic tomatoes available each week
Snow Peas
Leeks
Turnips
Lettuce
Spinach
Carrots
Onions
Jalapeno peppers
Bell Peppers
Red Beets
Swiss Chard
Herbs and Spices
Okra
Cucumbers
Zuccini
Squash
Cabbage
Broccoli
Green Beans

Items not grown by us:
Mangos
Nectarines
Peaches
Pears
Avacado
Celery
Artichokes


Friday, July 8, 2011

Green Thumb Tip # 3 Watermelons

Happy Friday!

You might be thinking "Watermelons don't grow in Idaho so I don't need this one.  However, we have many little watermelons, honeydew, and cataloupe growing in our little greenhouse.  With a greenhouse you are able to grow so much more than just in the open air in Rexburg.  It is because of this greenhouse we are able to have much of the produce and herbs we currently do.  While our melons are not quite ready, here is a nifty tip I found to help you find that perfect melon at the store.

Tips for Picking a Ripe Watermelon

I have found one of the best places to buy a watermelon is from your local farmer's market or fruit stand. Fruits like watermelon are picked when ripe, unlike those found in supermarkets. Watermelons sold in commercial grocery stores are often picked early,so they can ripen while being transported. However, the melons can arrive too early, even too late, and making them, well, just not good.

Look for a melon that is nice looking, meaning free of dents, bruises, cuts, etc. Check under the melon - if it has a yellow or light bottom, it should be ripe. If it's stripes are found all around the melon, pass on it. It's just not ready yet.

You may see people at the market tapping on watermelon. What exactly are they listening for? The are checking for signs of hollowness. It is sounds hollow, its ripe. Not hollow, unripe.

Look for a heavy melon. Watermelons are made up of mostly water, so an ideal melon should be heavy for its size.

http://mideastfood.about.com/od/tipsandtechniques/f/watermelonripe.htm

Wednesday, July 6, 2011

Cherry Limeade - Great for any day and any time

With all the Cherries coming into season this would be a great treat after being out in the sun all day.  This week at the Farmer's Market Grove City Gardens has a lot of great cherries for sale at a great price.  So check them out at either the Rexburg location or at the Pier View Market in Idaho Falls. 

http://www.goodlifeeats.com/2011/06/cherry-limeade-recipe-slushies-recipe.html?utm_source=feedburner&utm_medium=feed&utm_campaign=Feed%3A+goodlifeeats+%28goodLife+%7Beats%7D%29&utm_content=Twitter

Cherry Limeade Slushies and Limeade Recipe

We have been enjoying these Cherry Limeades so much lately. They’re a little bit addicting, but in a good way and they’ve been great when we have needed a little sweet treat at the end of the day. They’d be a perfect addition to your 4th of July picnic or barbecue this weekend.
cherry limeade recipe
Now, don’t get this confused with the ever popular Sonic Cherry Limeade. I’m all for ordering one on occasion, but this recipe leaves me feeling just a tad bit less guilty since these homemade slushies don’t contain any soda or high fructose corn syrup. Plus, it’s supplemented with real fruit pureed with the limeade.
What’s so great about this recipe is it’s simplicity. One batch of homemade limeade will make you several batches of Cherry Limeade . But, if you really want, you can use an all-natural store bought limeade and then whipping up your very own slushy will only take a second.
cherry limeade slushie recipe
We’ve tried making these slushies with other fruits as well. Get creative with whatever frozen fruit you have stashed away in the freezer. Strawberries were also popular here in our house, but we decided that we like the cherry version best.
If you are a fan of Cherry Limeade, you might also like these Cherry Limeade Cupcakes that I made for a 4th of July celebration a few years ago.
Looking for more 4th of July menu ideas?

Drinks

Grilling

Dessert

Hope all of you in the USA have a wonderful, long weekend. Happy Independence Day!
Print

Cherry Limeade Slushies

Limeade adapted from Strawberry Lemon-Limeade
serves 2 - 4

Ingredients:

For the Cherry Limeade Slushies:
2 cups Limeade, recipe follows*
1 - 2 cups crushed ice, according to preference
1 1/2 cups frozen cherries
For the Limeade:
1 cup sugar
1 cup of water1 cup fresh lime juice
4-6 cups cold water (according to taste)
*alternatively, use all-natural store bought limeade if desired.

Directions:

For the Cherry Limeade Slushies:
Combine the 2 cups limeade, crushed ice, and frozen cherries in a blender. Start with 1 cup crushed ice and add additional ice until desired slushy-ness is achieved. Puree until blended to slushy consistency. Serve immediately.
For the Limeade
Combine the sugar and 1 cup of water in a small saucepan to make a simple syrup. Cook over medium heat until the sugar has dissolved. Let cool. In a pitcher, combine the simple syrup, lime juice, and cold water. Adjust water according to your sweet taste preferences. Chill.

Tuesday, July 5, 2011

Melon Update

I walked out to our greenhouse this morning and was excitied to see little melons appearing.  We have melons showing up on our Cantaloupe and Watermelon plants and we are so excited to see them. 


Our Tomatoes are also ripening well.  We hope to have many Grape, Roma, Early Girl and Beefsteak tomatoes to be able to take to the market this weekend. 


Other items we hope to have this week or next are peas, Swiss Chard, and Cauliflower.  I'll keep you posted on what we will have for certain on my next post this Thursday with our next Green Thumb Tip. 

Thursday, June 30, 2011

Green Thumb Tip #2

I apologize that it has take so long to get a new post up, but here it is.

This week it is on Broccoli and how to keep pesky pests out of your plants.  Included also is a link to why growing broccoli is a great way to maintain your health.  Enjoy!


Growing Broccoli whilst minimising pest problems will mean following some sort of crop rotation plan.
This simply means not growing vegetables of the same family in the same piece of earth year after year...it encourages pest build up in the soil. For Broccoli this also means - Brussels Sprouts, Cabbage, Kohlrabi, Turnip, Cauliflower.
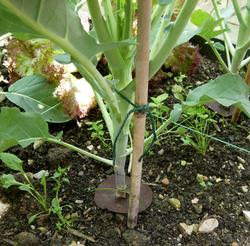
Purple Sprouting Broccoli Protected From Cabbage Root FlyCabbage Root Fly can be a problem so use protective discs at the base of the growing Broccoli as they lay their eggs in the soil at this point and when they hatch the little maggots burrow down and feed on the roots.
These discs can be made from old bits of hession backed carpet, underlay or roofing felt - use your imagination, or purchase them ready made from a garden nursery or DIY store.
Also cover with gardening fleece when the plants are young. Fleece is a great friend to the gardener, it allows rain and light through but insulates against frost and deters pests.
Keep a watchfull eye for the appearance of Caterpillars as left unattended they will devastate your growing Broccoli plants. They feed on the underside of the leaves and the best answere is to just pick them off and... squish `em.
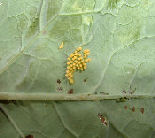
They also lay their eggs on the underside of the leaves too so look for yellow clusters aannndddd... squish `em. If you you haven't the time to keep squishing - or the stomach, then use `Just Caterpillar`. It uses nematodes to provide an environmentally safe and efficient treatment which can be watered straight onto edible plants.
Use `Just Caterpillar` once they are seen on the plant, preferably whilst they are still small, and the nematodes will quickly seek out the caterpillar and kill it. Get it from your garden centre.
It`s a blood thirsty game learning how to grow Broccoli - the carnage is terrible. ;0)


Mealy Aphids from how to grow brussel sprouts http://www.vegetable-garden-guide.com/how-to-grow-brussel-sprouts.htmlLarge White butterfly eggs from how to grow brussel sprouts http://www.vegetable-garden-guide.com/how-to-grow-brussel-sprouts.htmlSmall White caterpillar from how to grow brussel sprouts http://www.vegetable-garden-guide.com/how-to-grow-brussel-sprouts.html
Aphids are a serious pest, weakening your growing Broccoli plants and introducing viruses which further weaken plants. Spray with Derris if infestation is serious.


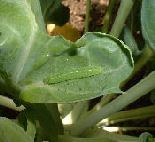
Eggs of the Large White butterfly. Caterpillars can defoliate a plant quickly so watch out for them. Inspect the underside of the leaves for clusters and squish them. Practice your tennis strokes when the butterfly is aboutCaterpillar of the Small White butterfly. Defoliates plants quickly, watch out for them. Pick off and destroy, use a nematode spray or spray with Derris. Eggs are laid under leaves in a random way, not in clusters, nor are they brightly coloured.


Club Root is a fungus and all brassicas (thats the family umberalla for Broccoli along with Brussels Sprouts, Cabbage, Kohlrabi, Turnip, Cauliflower) can be affected.
The roots of your young growing Broccoli become stubby and swollen. Leaves become yellow and wilt causing severe stunting of growth. This causes swelling and reduces the flow of water and nutrients to the plant. Spores are produced and can survive in the soil for up to five years.
Prevent club root by practicing crop rotation and take extreme care if you buy in seedlings from outside as this is often the way this fungus is introduced.
Reducing the acidity of the soil by adding lime will help.

Aphids can be a serious pest by weakening your growing Broccoli plants and introducing viruses. Try planting Marigolds or Tagetes plants among the crop. They attract beneficial insects like hover flies and ladybirds which feed on the Aphids and will help reduce the infestation.
Knowing how nature operates helps us understand how to grow Broccoli and other vegetables in a way that helps your environment positively. But spraying is the only way to make a real impact on badly infested plants.
Get advice from your garden center for sprays that can be used - they change so regularly as new legislation takes effect.
Flea Beatles are tiny beetles that can make sieves out of your brassica leaves. When you touch the Broccoli leaves they ping off just like regular fleas, only these won't bite you! To deter them:
  • Use horticultural fleece placed over your broccoli, as soon as you transplant them outside; a floating row cover.
  • Lightly hoe over the soil regularly to destroy eggs and larvae and expose them to predators.
  • Give your plants a mid-day shower with the hose (not in full sun though), as they're most active then and they don`t like wet conditions.
  • Try `Companion Planting`, to attract the beneficial insects.

Vast changes have taken place in the UK and Europe concerning the availability of pesticides during recent years to the extent that most have been removed from retailers shelves. Visit your garden centre or nursery and seek their advice as what to use.

When your learning how to grow Broccoli, it is important to be able to recognise the pests from the goodies - you don`t want to kill the goodies if you can help it. So observation is the way to to become knowledgeable... it all adds to the enjoyment.